Creating the simplest one-page WooCommerce checkout
Over the years, we have built a lot of WooCommerce websites but never paid attention to the simplification of the checkout process. Just recently, we had a rude awakening, when one of our clients said that the checkout process was tedious because of the numerous forms to be filled. This has prompted this very crucial tutorial on how to create the simplest one-page WooCommerce checkout page.
We all know how important user experience is, and how it can either have you retain or lose your customers. Well, we are not in the business of having you lose customers, so, let’s dive straight into this.
Setting default shipping to customer billing address
On the checkout page, WooCommerce may require you to choose if you want to use your billing address as the shipping address or not. In case your billing address is different from shipping address, then this may be good for you.
Assuming that billing and shipping address is the same, then, why not have just one form? We implement this by making the shipping address same as billing address.
Go to Woocommerce > Settings > Shipping Tab > Shipping Options Tab
Select “Default to customer billing address” and save, as illustrated below:
Enabling one-page checkout
To enable one-page checkout, simply install WooCommerce Single Page Checkout plugin and activate it.
Then go to pages and find “checkout” page, edit it and replace the default WooCommerce checkout shortcode with:
[rg108_woocommerce_single_page_checkout]
After that, go to “Settings” > “Checkout Settings” and set both fields to “Two Column.”
Removing optional and required fields
The billing details form has a whole lot of fields to be filled as seen below, email address being the last form.
There is also the additional information (order notes) form on the right which very few customers may find necessary to use.
 To remove some of these fields, we use custom functions.
Custom functions can either be pasted in the child/parent theme’s functions.php or you can use a plugin to insert the custom code.
In this case, we will use “My Custom Functions” plugin to insert the codes.
Download/search for the plugin, install and activate it then go to “Settings” > “PHP inserter” and paste the codes below:
/* The Code Below Removes Selected Checkout Fields. You can comment out fields you want to leave. */

add_filter( 'woocommerce_checkout_fields' , 'custom_override_checkout_fields' );

function custom_override_checkout_fields( $fields ) {
unset($fields['billing']['billing_city']);
unset($fields['billing']['billing_postcode']);
unset($fields['billing']['billing_address_1']);
unset($fields['billing']['billing_country']);
unset($fields['billing']['billing_state'] );
unset($fields['billing']['billing_phone']);
unset($fields['order']['order_comments']);
return $fields;
}

/* This Removes The Additional Information Tab */
add_filter( 'woocommerce_product_tabs', 'woo_remove_product_tabs', 98 );
function woo_remove_product_tabs( $tabs ) {
unset( $tabs['additional_information'] );
return $tabs;
}

/* This Removes The Additional Information Title Text */
add_filter('woocommerce_enable_order_notes_field', '__return_false');
The specific fields removed by the code above have been explaind and some are just what they are, phone number, postcode etc.
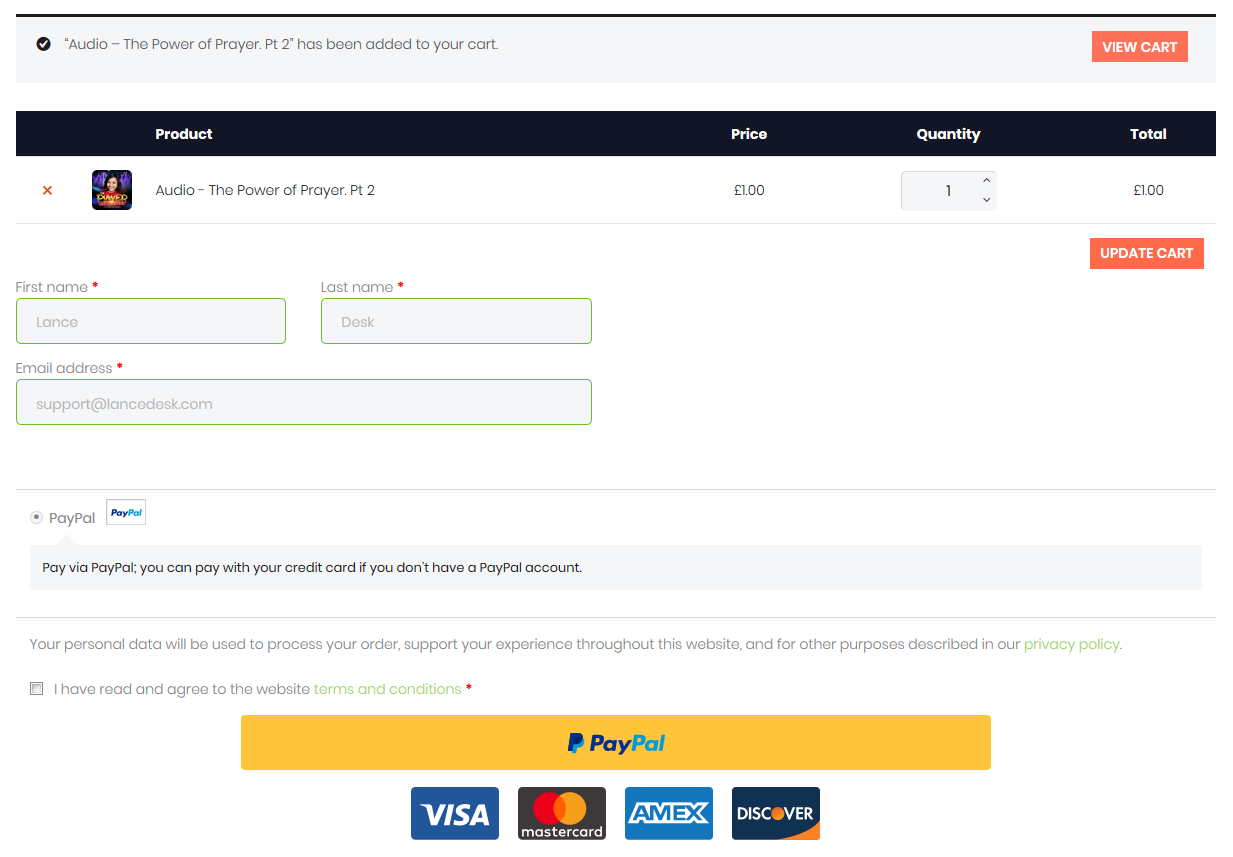
The resulting checkout form
When the code above is used, the result is shown below:
Note: This is an excellent solution for stores selling services and products that do not need shipping. However, if you ship your products, then take out fields that are not necessary but leave those that are crucial in helping you ship your products to buyers.
Hopefully, this tutorial helps you to create the simplest one-page WooCommerce checkout page. This will not only impress your customers but also retain them.
Also learn how to redirect default WordPress registration to WooCommerce to avoid spam registrations.


